All Things Andrea

All Things Andrea

Wednesday, September 29, 2010

To Reuse or Not??


 OK, everyone I know who cans says, "ABSOLUTELY NOT!"  "NO WAY!"  "DON'T YOU DARE!  "IT'S NOT SAFE!!!"  But, I'm not convinced.  I have been reusing canning lids for a long time; I reuse them once, then throw them away.  I carefully inspect them before reusing them.  I make sure they are clean, lay flat - they basically need to look like they're brand new (other than the writing).  If not, I toss them.  If they have a little outward nick on the edge from being opened in a previous life,


I simply roll the lid along the counter to smooth it out:


I have had just as good a success with the reused lids sealing, if not better.   My guess is that I could use them even another time or so, but since I have so many from friends who pass them on to me, I can afford to pitch them after I've reused them once.  :)  It saves a ton of money, and I'm able to can up a storm without having to factor in the cost of new lids.  Plus, it always was and still is the green way to go!  And, there's nothing more endearing that reusing a lid from a friend: 


Emma is growing up now, and no longer writes the year 2006 as "20006", 


 or feels the need to put a smiley face and her name on a jar lid.  :)

Washing Antique Quilts


Before I tucked this 1940's-era quilt away, I thought it made sense to wash it - I had used it on my bed as a teenager, and was pretty sure it hadn't been laundered in years, probably because it was worn and my mother hesitated to cause any more deterioration.  I've been wanting to launder it for quite a while, but was nervous.  However, a dirty, smelly quilt isn't exactly a pleasant thing.  So, I read up on the process and took the plunge. 

Before I attempted to wash it, I hand basted tulle over several of the frayed blocks to protect them from any more damage; I'll remove the tulle once the quilt is dry.


What soap should I use?   I chose Orvus Quilt Soap, frequently recommended because it's gentle and doesn't contain phosphates or optical brighteners.  Interestingly enough, you can buy the very same product for a much cheaper price at the local farm supply store - it's used for washing horses or pets!  :)  However, they only sell it in a huge container, and since it only takes a tablespoon per load, it's worth paying the higher price for a smaller bottle from the quilt shop or fabric store.  Most experts recommend washing an antique quilt in the bathtub, but I decided it would be just as safe if I washed it on the gentle cycle in my washing machine, as long as I made sure the machine agitated it only briefly.  I washed it twice, with 2 rinses the first time and 3 rinses the second washing.  A wet quilt is extremely fragile, so it's important to lift it out of the water very carefully;  I put a sheet underneath it and lifted it out.  Then, I spread it out flat on a sheet on the lawn to dry.  (Never hang a wet quilt.)  I thought today would be a good day since it was cloudy (an old quilt shouldn't be exposed to direct sunlight), but that wasn't the case - it was too damp and the quilt didn't dry before an afternoon shower came through.  In fact, it didn't dry much at all!  I scooped it up; it's now spread out on the floor in my basement with the dehumidifier running on high - not the ideal method! 

I  also washed a c. 1800's whole-cloth quilt (not a pieced quilt - simply plain muslin fabric that nicely showcases the quilting design).  It has a very thin batting, so I thought it would dry quickly, but that wasn't the case either.  It's currently spread out on the floor in my basement as well!

Update:
I just inspected the quilts - they dried quickly indoors, and the 1940's quilt survived laundering nicely.  Yea!  A few blocks may have frayed a bit more, but it was worth it - it smells fresh and clean and no longer looks so dingy.  Besides, I love the look of a worn quilt.  One plus of a having a quilt fall apart - you get to see what kind of batting was used.  I was surprised - I thought it would have been more of a nappy flannel fabric instead of something so coarsely woven.


Interesting!

After the quilt was completely dry, I did hand stitch a few repairs - just enough to keep some of the blocks from getting any worse.  Only certain fabrics are worn - my guess is that they may have been older scraps, or it could be related to the dye that was used.  It's now happily tucked away - this time I neatly folded it and put it on a closet shelf where I can easily view it from time to time; I wanted to protect it from dirt and sunlight, but also wanted to be able to visit it.
:)

Monday, September 27, 2010

The Help

I just finished reading The Help, by Kathryn Stockett.  Excellent read!  I enjoyed discussing it with my book club this evening!

Friday, September 24, 2010

Dehydrated Apples


A college friend spent the day with me yesterday and was kind enough to peel and slice apples for dehydrating while I prepared supper.  They'll be perfect for tossing with an assortment of nuts and other dried fruit for an on-the-go snack or for adding to my granola.  Thanks, Rhonda!


Sunday, September 19, 2010

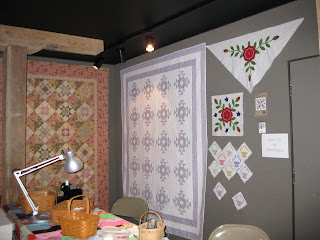
Fort Hunter Day Quilt Display


I had the wonderful opportunity to display my entire quilt collection as well as share my love of quilting today at Fort Hunter Day in Harrisburg.  It was a last-minute invitation, but such a deeply meaningful event - the day was truly meant to be!  It was thrilling to be able to exhibit seven 1800's-era quilts from my fraternal great aunts and three 1930/1940-era quilts from my maternal grandmother, along with 14 of the 16 quilts I've made over the past 19 years.  The antique quilts had been safely stored away in a blanket chest in my home for a number of years and were begging to be viewed.  Never before have all my quilts been on display in one room; they looked so pleased to be together!  And, I've never had the chance to stand back and view my quilts from a distance; it gives a completely different perspective.  The gallery setting and lighting was amazing.  It was also incredibly meaningful to sit among them all day and share their stories with lots of people who love quilts or have fond attachments to their own family heirlooms.  I met some kindred spirits and learned from those who attended.  What a magnificent day!


My price possession - a circa 1860's "Pineapple Quilt" from my Great Aunt Mary's household.


Thursday, September 16, 2010

Comfort Food

On a cool, rainy September evening, I was craving some comfort food, so decided to make this risotto recipe.  I had been wanting to try my hand at risotto for quite a while now.  And, I had a pound of mushrooms in the fridge from my Tuesday trek to Root's that needed to be used.  Yum!!  It provided the comfort I was hungering for and then some.  It never occurred to me to take a picture until after I had devoured it (I did cut the recipe in thirds!)....

Gourmet Mushroom Risotto
Source:  allrecipes.com

6 c. chicken broth, divided
3 T. olive oil, divided
1 lb. portobello mushrooms, thinly sliced*
1 lb. white mushrooms, thinly sliced
2 shallots, diced*
1 1/2 c. Arborio rice**
1/2 c. dry white wine*
sea salt to taste
freshly ground black pepper to taste
3 T. finely chopped chives
4 T. butter
1/3 c. freshly grated Parmesan cheese

Directions:
In a small saucepan, warm broth over low heat.

Warm 2 T. olive oil in a large saucepan over med-high heat.  Stir in mushrooms and cook until soft, about 3 min.  Remove mushrooms and their liquid and set aside.

Add 1 T. olive oil to skillet and stir in shallots.  Cook 1 min.  Add rice, stirring to coat with oil, about 2 min.  When rice has taken on a pale, golden color, pour in wine, stirring constantly until wine is fully absorbed.  Add 1/2 c. broth to the rice, and stir until broth is absorbed.  Continue adding broth 1/2 c. at a time, stirring continuously, until liquid is absorbed and rice is al dente, about 15-20 min.

Remove from heat; stir in mushrooms with their liquid, butter, chives and Parmesan.  Season with salt and pepper to taste.

*My notes:
I used only white mushrooms instead of the two varieties.  I didn't have any shallots on hand, so I substituted 1 part garlic to 2 parts onion.  And, I skipped the white wine.  Still, a great recipe!
**The Arborio rice is the secret to the creamy, risotto texture.


Sunday, September 12, 2010

Today's Lyrics

"I love the way the universe is singing Your song, so I'll try to sing along."
- Sixteen Cities

Saturday, September 11, 2010

Quotes Worth Contemplating

"There's nothing like staying home for real comfort."
- Jane Austin

Blogging Blocks

One of my goals for this season of my life was to "to live life, write about it and allow it to take me where it's supposed to", but currently I'm finding that it's hard to make time for both the living and the writing!  Plus, a number of times I found myself writing about living, but I was actually cooped up inside writing on a beautiful day or evening - a bit of a contradiction!  (Maybe that means it's time to invest in a laptop!)  I've been snowed under these last weeks with outside work, sewing work, work work, medical pursuits and just life in general.  But, now that the outside yard and garden work is winding down, I'm hoping to get back to blogging, both on this blog and my In Season blog.  I plan to post-date entries so that I have an accurate record of this summer's activities, etc.  Feel free to check back shortly!

Friday, September 10, 2010

Chef Switzenberg

"Instead of manipulating food to make it taste good, use good food and keep the recipe simple."

I had the fun of attending a cooking class this evening, entitled "Tapas from Spain."  Chef Jim Switzenberg passionately prepared a wide assortment of yummy Spanish tapas, but best of all, he embodied my deeply-held food belief - that the best food is local, unprocessed and simple.

Sunday, September 5, 2010

How to Roast a Pepper


I think I finally found the secret to roasting peppers!  There are a number of ways to do it, but the easiest way I've found is to use the oven.  Simply arrange them on a rimmed cookie sheet and bake at 400 degrees for 20-30 minutes, turning once or twice to prevent them from sticking.  They blacken as much as when grilled, but the skin will puff up like a balloon, making it easy to pull off.  Then, put them in a container and cover with a lid or plastic wrap, or you can even put them in a brown paper bag, folding the top down to close.  This will allow the steam to finish loosening the skin.  Allow them to cool for 10-15 minutes.  Once they have cooled, pull off the skins.  Don't rinse them - you'll end up washing their delicious juice down the drain.  Also, put the skins in the trash, not the garbage disposal to prevent clogging your plumbing.

I usually freeze chopped, roasted red peppers in 1/4 cup portions in small bags so it's ready to use in my favorite "Roasted Red Pepper Hummus"recipe.  And, 1/4 cup is a nice portion to throw into various other recipes.


Here's the recipe:

Roasted Red Pepper Hummus
Source:  Kristy Y.'s mother- in-law

1/3 c. mayonnaise (you can substitute olive oil if you wish)
1 T. fresh lime juice
1 can garbanzo beans, drained and rinsed
1/4 c. roasted red peppers, chopped
2 garlic cloves, minced
1/2 t. chili powder
1/4 t. cumin
1 t. sea salt

Blend above ingredients in food processor until smooth.

9/10/10
Update:  I just came home from a cooking demonstration where I learned two more tricks!  1)  Coat the peppers with oil; this will allow them to get hotter.  2) Put the peppers in the refrigerator to cool - that will make them even easier to peel.  I haven't tried it yet, but will the next time I roast a batch of peppers!

Aerating


No, I did not just post a picture of dog dirt on my blog!  Instead, this is the cool by product of a successful aerating job!


Aerating is a great way to improve the health of your lawn without chemicals, and fall is the best time of year to tackle it.  My neighbors next door are committed to a chemical-free lawn, so they again coordinated renting an aerator for the day and splitting the cost with any neighbor who was willing to expend some energy.  It's such a cheap alternative to having it professionally done.  My next-door neighbor was also kind enough to do the grunt work for me; in return, I paid his share of the rental fee - now that's a deal!!  This year since the soil was so dry, we had to soak the ground with sprinklers ahead of time; otherwise the aerator spikes won't penetrate the soil sufficiently, and we wouldn't have gotten much benefit from process.

Looking forward to a greener, lusher lawn in 4-6 weeks without any chemical regrets!

Saturday, September 4, 2010

Vintage Baby Quilt


A customer asked me to finish this dear little baby quilt that was stitched by her mother years ago; they discovered it when they cleaned out her house after her death, no idea who it was intended for.  But, a little grandniece's birth was being anticipated, so this would make a perfect gift.


I simply machine tacked (my new Bernina's button stitch does a great job at that!) some pink bows in the corners of the blocks and machine stitched a self-binding to finish off the quilt.


I love the cross-stitched vintage blocks....

Canning Tomatoes

Sun-Dried Tomatoes...


... is simply a fancy word for dehydrated tomatoes - one of the easiest fruits to dry!    Plum tomatoes work the best, since they're not as juicy as other varieties. 


I simply sliced the tomatoes in half, placed them on trays, and dehydrated until they were leathery.  Talk about saving money - sun-dried tomatoes packed in olive oil and herbs are so pricey in the store, probably because most people don't realize what a rip off they are!  I'll store these dry in jars for now (they keep better that way), then rehydrate them and add olive oil and seasonings when  I'm ready to use them.  Yumm!